
How to Unarchive in Gmail: Easy Step-by-Step Guide
Learn how to unarchive in Gmail across devices. Quick, simple steps to find and restore your archived emails efficiently. Click to master the process!

Ever had that sinking feeling when an important email just vanishes from your inbox? You know the one—the flight confirmation, the client's final approval, the password reset link you swore you just saw. Chances are, you didn't delete it. You probably just archived it.
The good news is that getting it back is simple. The secret to how to unarchive in Gmail is to look in your "All Mail" folder and then select "Move to Inbox." It’s not hidden in some secret vault, just tucked away to keep your main inbox clean.
Finding and Unarchiving Gmail Messages Quickly

That moment of panic is something we’ve all experienced. But Gmail’s archive feature isn’t a black hole; it’s much more like a digital filing cabinet. Your emails are safe and sound, just out of immediate view.
Understanding the Gmail Archive
Think of your inbox as your active to-do list and the archive as your "everything else" file. When you archive a message, Gmail just strips off the "Inbox" label. The email itself is perfectly safe and searchable within the "All Mail" view, which is exactly what it sounds like—a collection of every single message you’ve sent or received (that hasn’t been trashed).
This feature is a lifesaver for the platform's 1.5 billion active users. It lets you declutter your primary inbox without permanently deleting anything, keeping your workspace tidy while ensuring you can find that old receipt or project brief months later.
For example, I always archive online order confirmations right after I get them. I don't need them clogging up my inbox, but I definitely want that record for returns or warranty claims down the road. When I need it, a quick search in "All Mail" brings it right up.
Key Takeaway: Archiving is not deleting. It’s a core strategy for keeping your inbox organized while making sure your emails are always accessible.
This simple habit is a cornerstone of effective email management. For anyone looking to truly master their inbox, our guide on Gmail organization tips digs into more advanced strategies.
To make things even easier, here's a quick cheat sheet for unarchiving emails, no matter what device you're on.
Quick Guide to Unarchiving on Your Device
This table breaks down exactly where to look and what to do to bring an archived email back into your main inbox across different platforms.
| Device | Where to Find Archived Mail | Action to Restore to Inbox |
|---|---|---|
| Computer/Web | "All Mail" folder or Search | Select email, click "Move to Inbox" |
| Android App | "All Mail" folder | Tap three dots, select "Move to Inbox" |
| iOS App (iPhone/iPad) | "All Mail" folder | Tap three dots, select "Move to Inbox" |
As you can see, the process is pretty consistent whether you're at your desk or on your phone. Just head to "All Mail," find your message, and move it back. Simple as that.
How to Unarchive Gmail Messages on a Computer
If you're sitting at your desk, you have the most powerful tools for managing Gmail right at your fingertips. When it comes to finding an archived message, the web interface on your computer is far superior to the mobile apps, mainly because its search and filtering capabilities are much more robust. It’s the perfect environment for digging up that specific email you tucked away for later.
Your first instinct might be to start scrolling endlessly through the “All Mail” folder. There's a much smarter way. The trick is to use Gmail’s search bar to your advantage, turning what feels like a needle-in-a-haystack hunt into a quick, precise find.
Pinpoint Archived Emails with Search Operators
The most efficient way to see only your archived messages is to tell Gmail what you want to exclude. A simple search operator can filter out everything currently cluttering your main inbox, leaving you with just the items you’ve filed away.
Here’s the magic command you need:
-in:inbox
Just type that phrase directly into the Gmail search bar and hit Enter. This command tells Gmail to show you every single message except for the ones that have the "Inbox" label. It’s a clean, foolproof way to isolate your archived communications without any distractions.
You can even get more specific by combining it with other search terms. For example, typing -in:inbox from:dave will pull up only the archived emails from Dave.
Pro Tip: After you run this search, bookmark the results page. This creates a handy one-click "Archived" folder right in your browser's bookmarks bar, giving you instant access anytime you need it.
The process of bringing an email back to your inbox is pretty straightforward, as this visual guide shows.
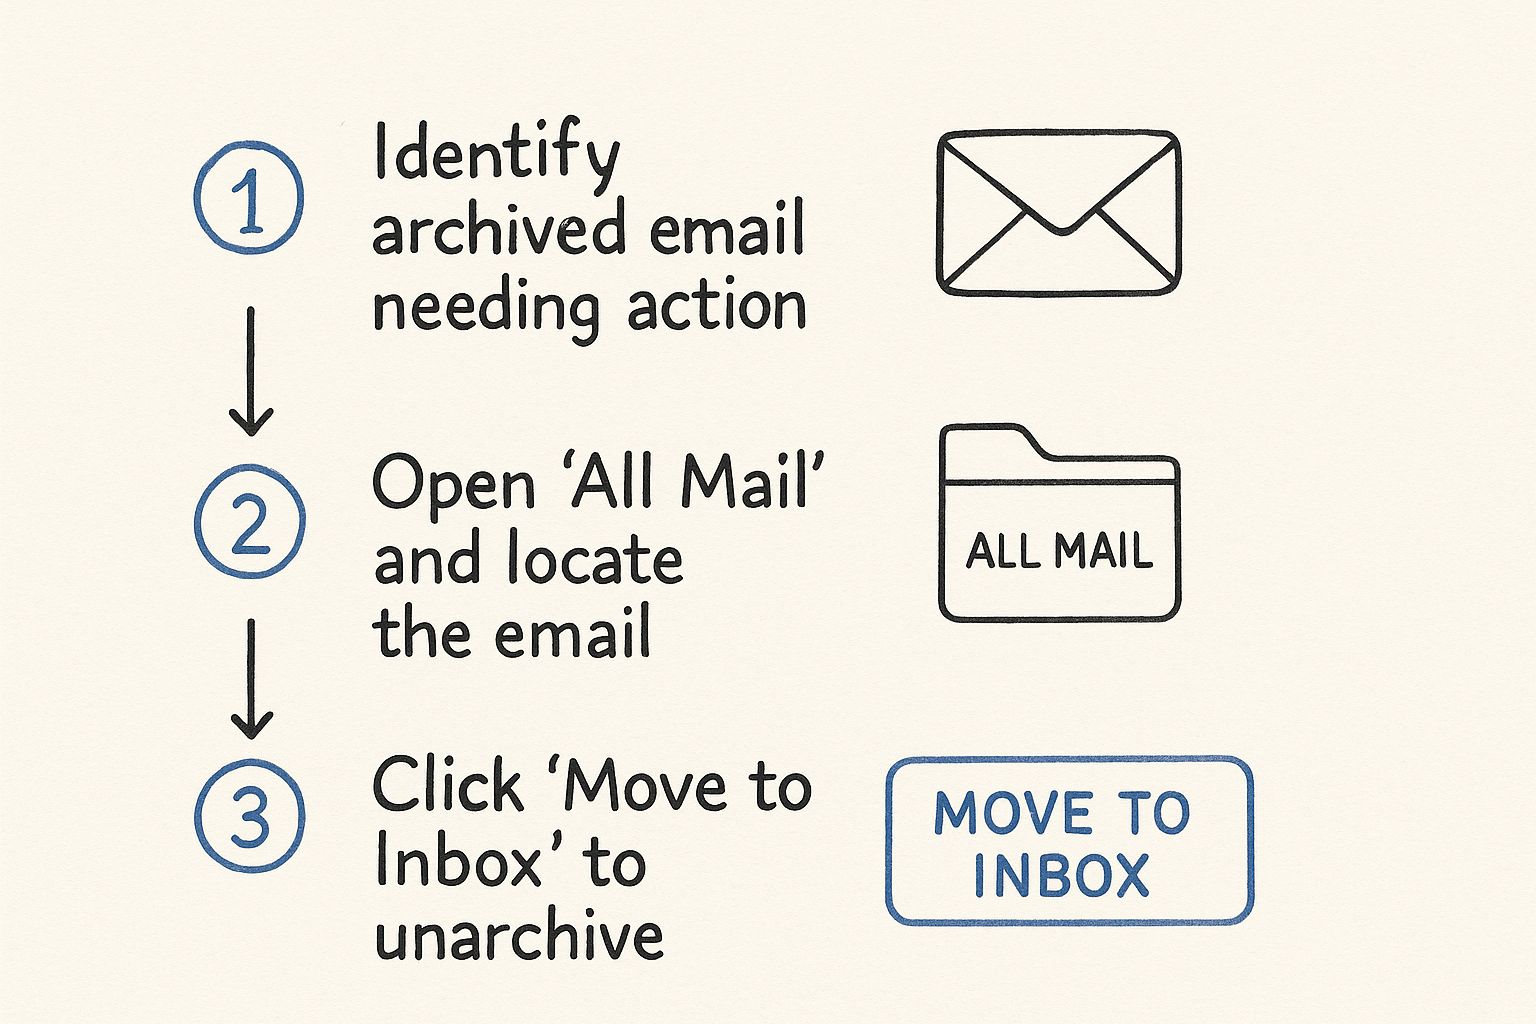
This breaks down the entire flow into three core actions: finding the email, identifying it as archived, and moving it back.
Moving an Email Back to the Inbox
Once you’ve found the email you’re looking for—either by browsing "All Mail" or using the search trick—the final step is a breeze.
Open the email conversation. You'll see right away that it’s missing the little "Inbox" label next to the subject line. That’s your confirmation that it's currently archived.
Look at the row of buttons at the top of the email. You're looking for the "Move to Inbox" button, which usually has an icon of a box with a downward-pointing arrow.
Click that button. Instantly, the email will be sent back to your main inbox, ready for you to reply or take action. If you need to unarchive a bunch of messages at once, just stay in the list view, use the checkboxes to select all the emails you need, and then click the "Move to Inbox" button.
Restoring Archived Emails on Android and iOS
Let's be honest, most of us manage our inbox from our phones these days. Whether you're on your morning commute or just away from your desk, knowing how to unarchive emails in the Gmail app is essential for staying on top of critical conversations. Thankfully, the process is practically identical on both Android and iOS, so once you learn it, you're set.
Your first line of defense against an accidental archive is the "Undo" pop-up. The second you archive an email, a small notification bar appears at the bottom of your screen for a few seconds. A quick tap on "Undo" instantly brings it back. But if you miss that fleeting window, don't worry—getting your email back is still straightforward.
Just like on your computer, your archived messages are tucked away safely in the "All Mail" folder.
Finding and Moving Messages on Mobile
The whole trick is knowing where to tap. In the Gmail app, tap the three-line menu icon (often called the "hamburger" menu) in the top-left corner. This action slides out the main navigation panel where you'll find all your different folders and labels. Just scroll down until you spot "All Mail" and give it a tap.
Once you're in the "All Mail" view, you've got a couple of ways to find what you're looking for:
- Scroll and Find: If you just archived the email, it's probably near the top. A little scrolling should do the trick.
- Use Mobile Search: For anything older, tap the magnifying glass icon at the top of the screen. Searching is always going to be faster than endlessly scrolling through months of email.
After you've located the email you want to restore, you're just a few taps away from getting it back in the inbox.
Key Insight: The entire process is designed for quick recovery. Simply tap-and-hold the message you want to bring back. This selects the email and makes a new menu appear at the top of your screen. From there, tap the three-dot menu icon in the top-right corner and choose "Move to Inbox" from the list.
Unarchiving Multiple Emails at Once
What if you accidentally archived a whole conversation or need to restore several emails? The process is just as simple. After you tap-and-hold the first email to select it, you can just tap on any other emails you want to unarchive. Each one will be added to your selection.
With all the right emails selected, hit that same three-dot menu and choose "Move to Inbox." This bulk action is a massive time-saver. Mastering little mobile Gmail tricks like this is crucial, and you can find even more ways to work smarter with these top productivity tips for Google Workspace users.
Using Advanced Search to Find Any Archived Email
Let's be real. When you need to dig up a specific archived email, scrolling through the “All Mail” folder is a nightmare. It feels like searching for a needle in a haystack, especially when your account is packed with thousands of messages.
The key to unarchiving in Gmail like a pro is to stop the endless scrolling and start searching with a bit of strategy.
Mastering Search Operators
Gmail's advanced search operators are your secret weapon here. Think of them as simple commands that let you filter your entire email history with surgical precision. Instead of just guessing at keywords, you can tell Gmail exactly what—and where—to look. This turns a frustrating hunt into a quick, seconds-long task.
The most important operator for this job is -in:inbox. This little command tells Gmail to show you everything except what's currently sitting in your primary inbox. Right away, this effectively creates a focused view of all your archived mail.
From there, you can layer on other operators to zero in on what you need. For example:
from:sarah -in:inboxwill find all archived emails from Sarah.subject:(Q3 Report) -in:inboxinstantly locates that archived Q3 report.has:attachment -in:inboxfilters for archived emails that have files attached.
Imagine you need to find an invoice from a vendor named "Innovate Corp" that you archived last quarter. Instead of getting lost in "All Mail," a quick search like from:innovatecorp subject:invoice -in:inbox will likely pull it up immediately. No more guesswork.
Pro Tip: You can also exclude terms to get even more specific. If you're looking for a project brief but know it didn't have any attachments, you could search for
subject:(project brief) -has:attachment -in:inbox. This is incredibly powerful for pinpointing exactly the right message.
With over 121 billion emails flying through Gmail every single day, it's no surprise that a ton of them end up archived to keep our inboxes sane. As you can see from these Gmail statistics insights, mastering advanced search is a critical skill for making sure nothing gets lost. Your archive is like a digital basement, and these operators are your flashlight.
Once you get the hang of these simple commands, you'll go from a casual user to a Gmail power user, able to pull up any piece of information with confidence and speed.
Troubleshooting Common Gmail Archive Issues

Even with a solid grasp of how to unarchive emails in Gmail, you can still hit a few snags. It’s a familiar story: you archive an email, only to see it pop right back into your inbox a few seconds later. Or maybe the "Move to Inbox" button has gone missing. These little quirks can throw a wrench in your workflow, but they almost always have a simple fix.
One of the most common head-scratchers is the "boomerang" email—the one you archive that just won't stay archived. In my experience, this is almost always caused by an overzealous Gmail filter. You might have a filter that automatically slaps the "Inbox" label onto messages from a certain person or with specific keywords. Since archiving simply removes that label, your filter is just doing its job and adding it right back.
Take a quick look at your Filters and Blocked Addresses settings. A quick review usually uncovers the rogue filter, and you can tweak or delete it to solve the problem. It’s a frequent culprit for anyone trying to stick to an inbox-zero habit.
Where Did My Buttons Go? Understanding System Labels
Another point of confusion I see often is a missing "Move to Inbox" button. If you can't find it, don't panic. It just means the email is already in your inbox. You're likely viewing it from a different label or a search result, but as far as Gmail is concerned, it's already home. You can't move something to a place it already is.
It's also crucial to get how system folders work, because they play by their own set of rules.
- Spam: You can't move a message directly from Spam to your inbox. First, you have to hit "Not spam," which automatically does the moving for you.
- Trash: Likewise, deleted emails need to be moved out of the Trash folder first—to a place like "All Mail"—before you can re-archive them or send them back to the inbox.
Key Takeaway: System folders like Spam and Trash operate differently. The standard archive or "Move to Inbox" commands won't work there. You have to use their dedicated actions, like "Not spam" or "Move to," to get those emails back into circulation.
Getting a handle on these details is all part of building a stronger, more efficient workflow. If you're looking for more ways to get your digital workspace in order, these essential email management tips are packed with time-saving advice.
Your Gmail Archive Questions Answered
Even after you get the hang of unarchiving emails in Gmail, a few questions tend to pop up that can cause some confusion. Let's clear up the most common ones so you can manage your inbox like a pro, knowing exactly how the archive feature works in any situation.
Does Unarchiving an Email Mark It as Unread?
Nope, it doesn’t. When you pull a message out of the archive, it simply reappears in your primary inbox but keeps whatever read or unread status it had before.
If an email was already read when you archived it, it will show up in your inbox as read. To make it stand out again, you’ll have to manually select it and use the "Mark as unread" option after you’ve moved it back.
The Real Difference Between Archive and Delete
This is probably the single most important thing to get right. Think of it this way: archiving is like putting a document in a filing cabinet for safekeeping. Deleting is like running that same document through a shredder.
- Archiving just hides the email from your main view by removing the "Inbox" label. The message is still safe and sound in your "All Mail" folder, where you can find it later.
- Deleting moves an email to the "Trash" folder. And be warned: anything in the Trash is gone for good after 30 days.
Key Takeaway: My rule of thumb is simple. Always archive emails you think you might need again. The delete button should be reserved for spam, promotional junk, and messages you are 100% certain you’ll never want to see again.
What Happens if Someone Replies to an Archived Email?
This is one of my favorite things about Gmail’s archive system—it’s just plain smart. If a new reply comes in on a conversation thread you previously archived, Gmail does the heavy lifting for you.
The entire conversation, including all the older messages you tucked away, automatically jumps right back into your main inbox. It’s a brilliant, foolproof way to stay on top of active discussions without having to constantly check your archives.
Can I Unarchive Multiple Emails at Once?
Absolutely, and it’s a massive time-saver. You don't have to go through the tedious process of restoring messages one by one.
On a desktop, just navigate to your "All Mail" folder (or use the search bar to find what you need), and click the checkboxes next to every email you want to bring back. Once they’re all selected, hit the "Move to Inbox" button at the top. On the mobile app, the process is just as easy: tap and hold the first email to enter selection mode, then tap any others to create a batch before moving them all back to the inbox.
Ready to stop just managing emails and start managing workflows? Tooling Studio integrates a powerful Kanban board directly into your Gmail interface, turning your messages into actionable tasks. Share boards with your team, assign work, and track progress without ever leaving your inbox. Transform your Gmail into a collaborative workspace today.
 Download our Plugin