
Table of Content
'%3e%3cpath%20d='M22.2234%200H1.77187C0.792187%200%200%200.773438%200%201.72969V22.2656C0%2023.2219%200.792187%2024%201.77187%2024H22.2234C23.2031%2024%2024%2023.2219%2024%2022.2703V1.72969C24%200.773438%2023.2031%200%2022.2234%200ZM7.12031%2020.4516H3.55781V8.99531H7.12031V20.4516ZM5.33906%207.43438C4.19531%207.43438%203.27188%206.51094%203.27188%205.37187C3.27188%204.23281%204.19531%203.30937%205.33906%203.30937C6.47813%203.30937%207.40156%204.23281%207.40156%205.37187C7.40156%206.50625%206.47813%207.43438%205.33906%207.43438ZM20.4516%2020.4516H16.8937V14.8828C16.8937%2013.5562%2016.8703%2011.8453%2015.0422%2011.8453C13.1906%2011.8453%2012.9094%2013.2937%2012.9094%2014.7891V20.4516H9.35625V8.99531H12.7687V10.5609H12.8156C13.2891%209.66094%2014.4516%208.70938%2016.1813%208.70938C19.7859%208.70938%2020.4516%2011.0813%2020.4516%2014.1656V20.4516Z'%20fill='%2398A2B3'/%3e%3c/g%3e%3cdefs%3e%3cclipPath%20id='clip0_99_3851'%3e%3crect%20width='24'%20height='24'%20fill='white'/%3e%3c/clipPath%3e%3c/defs%3e%3c/svg%3e)
As the admin of your startup's Google Workspace, you aim to empower your team members to set up email forwarding within their Gmail accounts. Discover how to enable this feature by following the guide below.
Your team members might want to forward their emails to personal accounts or to a colleague's inbox during vacations. To facilitate this, enable automatic forwarding in your Google Admin console. This feature enables users to forward incoming messages from their Google Workspace email to another address. It’s useful for several scenarios, such as accessing work emails on a personal device or consolidating multiple email accounts into a single inbox.
Please note, to utilize this feature, both senders and recipients must possess a Google Workspace license since the forwarded messages are routed through their Gmail accounts.
Step 1: Enable Automatic Forwarding for Your Organization
You can enable or disable automatic forwarding in your Google Admin console. It’s enabled by default. If disabled, the forwarding option won’t be available in Gmail settings.
Before You Begin: If you need to apply this setting to a specific department or team, you must first add an organizational unit.
Instructions:
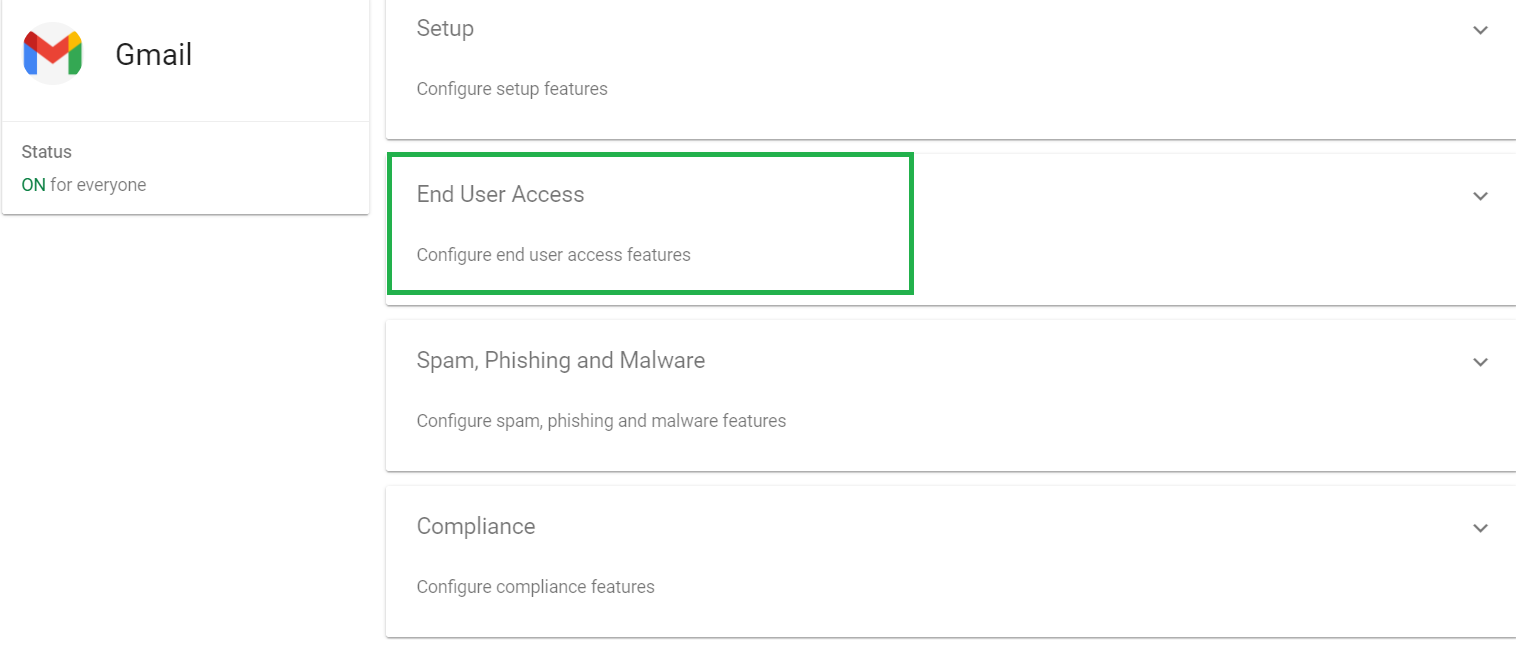
Sign in to the Admin Console:
- Go to the Admin console, navigate to Menu > Apps > Google Workspace > Gmail > End User Access.
Select Organizational Unit (Optional):
- If you want to apply the setting to a specific department or team, select the appropriate organizational unit on the side.
Adjust Automatic Forwarding Settings:
- Click on "Automatic forwarding" and uncheck the box labeled "Allow users to automatically forward email to another address."
Save Changes:
Click "Save." If applying to an organizational unit, you may need to click "Override."
To revert to the default setting later, click "Inherit."
Following these steps will allow you to control automatic email forwarding settings for your organization.
Step 2: Users Set Up Automatic Forwarding
Once automatic forwarding is enabled, users in your organization can configure forwarding for their Gmail accounts directly from their Gmail settings. This allows them to manage and update their forwarding preferences as needed. Each user can set up only one forwarding address.
Important Notes:
New messages will be forwarded, but spam messages are excluded.
To forward specific types of messages, users can create filters within their Gmail accounts.
Steps for Users to Set Up Email Forwarding
Open Gmail:
- On your computer, log in to Gmail using the account you want to forward messages from. Note that forwarding is only available for a single Gmail address, not for email groups or aliases.
Access Settings:
- In the top right corner, click on the ⚙️ icon and select "See all settings."
Go to Forwarding and POP/IMAP:
- Click on the "Forwarding and POP/IMAP" tab.
Add a Forwarding Address:
- In the "Forwarding" section, click "Add a forwarding address."
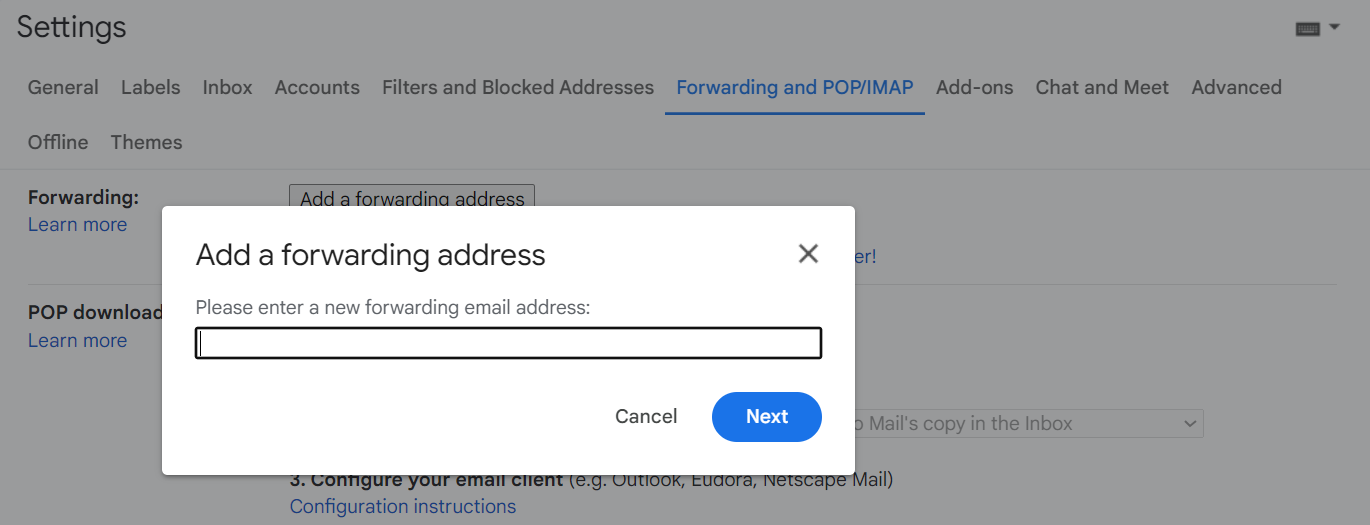
Enter the email address where you want your messages to be forwarded.
Click "Next," then "Proceed," and finally "OK."
Verify the Forwarding Address:
- A verification message will be sent to the forwarding address. Open that email and click the verification link.
Refresh and Configure Forwarding:
Return to your Gmail settings page and refresh your browser.
Go back to the "Forwarding and POP/IMAP" tab.
In the "Forwarding" section, select "Forward a copy of incoming mail to" and choose the forwarding address you added.
Choose Email Handling Option:
- Decide what to do with the Gmail copy of your emails. We recommend selecting "Keep Gmail’s copy in the Inbox."
Save Changes:
- At the bottom of the page, click "Save Changes" to activate forwarding.
By enabling and guiding your team through these steps, you streamline communication and ensure that important emails are forwarded appropriately within your organization.
By following these steps, you can efficiently manage and set up email forwarding in Google Workspace for your organization. Enabling this feature allows your team to seamlessly forward important messages and stay connected, whether they’re accessing work emails from personal devices or consolidating multiple accounts. Ensure you guide your team through the setup process to maintain smooth communication and productivity within your startup.
 Download our Plugin