Table of Content
From choosing the right plan to configuring key features, we'll help you harness the full power of Google's suite of tools. Whether you're a tech-savvy founder or new to cloud-based systems, this guide will ensure you're making the most of Google Workspace to drive your startup's success.
Learn how to create a digital ecosystem that scales with your business, supports remote work, and keeps your data secure. Let's get your small business or startup powered by Google Workspace!
Here, we’re focusing on helping small businesses to quickly set up a Google Workspace account.
Step-by-Step Guide on Setting Up Google Workspace for your Small Business
Step 1: Choose a Google Workspace Plan
- Visit the Google Workspace Pricing Page: Review the different plans available (Business Starter, Business Standard, Business Plus, etc.) and select one that fits your business needs.
Step 2: Sign Up for Google Workspace
- Visit the Google Workspace Signup Page: Click "Get Started".
Enter Your Business Information: Fill in your business name, the number of employees, and your country.
Provide Your Contact Information: Enter your first name, last name, and current email address.
- Choose a Domain: You can use an existing domain or purchase a new one through Google.
If you have a domain, enter it when prompted.
If you need a new domain, follow the instructions to purchase one.
Step 4: Create Your Google Workspace Account
- Set Up Your Username and Password: This will be your admin account for Google Workspace.
Access Your Domain Host: Follow the instructions provided by Google to verify your domain ownership.
Add the Verification Record: Typically, this involves adding a TXT record to your domain's DNS settings.
Access the Admin Console: Log in to the Google Admin console using your admin account.
Add Users: Navigate to the "Users" section to create accounts for your team members.
Manage User Accounts: Assign roles and manage identities for each user.
- Activate Gmail: If you didn't activate Gmail during sign-up, you can do so now.

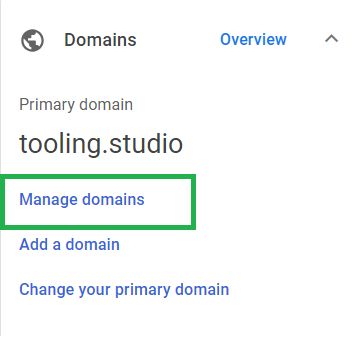
Navigate to ‘Domains’ >’ Manage domains’. Select ‘Activate Gmail’ next to your chosen domain. Complete the steps shown on the screen.
- Update MX Records: Follow the instructions to change your domain’s MX records to route email to Google servers. This process can take some time to complete.
Step 8: Migrate Data
- Import Users' Data: Use Google’s migration tools to import emails, contacts, and calendars from your previous service to Google Workspace.
Step 9: Configure Google Workspace Services
- Set Up Additional Services: Enable and configure services like Google Drive, Calendar, and Meet based on your business needs. (Menu > Apps > Google Workspace > Calendar. And similarly for other services) Click “Service status”. Click “On for everyone” or “Off for everyone” as per your choice and click ‘Save”.

- Add Your Logo: Customize your Google Workspace account by adding your business logo.
Step 10: Set up mobile devices
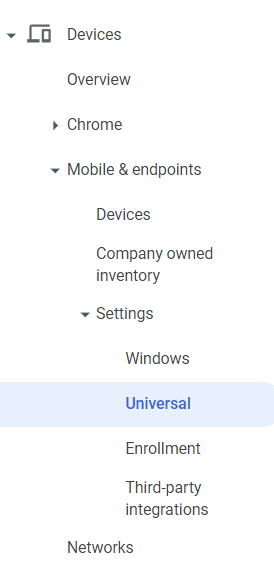
- Configure mobile management settings: Menu > Devices >Mobile & endpoints > Settings > Universal. Then choose General > Mobile management.

Apply basic or advanced management to all devices, or choose Custom to manage by device platform. Click Save.
Provide Training Resources: Share Google’s training materials and guides to help your team get familiar with Google Workspace tools.
Encourage Collaboration: Promote the use of tools like Google Docs and Sheets for team collaboration.
Step 12: Monitor and Manage Your Account
Regularly Check the Admin Console: Monitor user activity, manage settings, and ensure security measures are in place.
Stay Updated: Keep an eye on new features and updates from Google Workspace.
By following these steps, you can effectively set up Google Workspace for your business or startup, enabling a collaborative and efficient work environment. For more detailed instructions, refer to the original Google support article.
